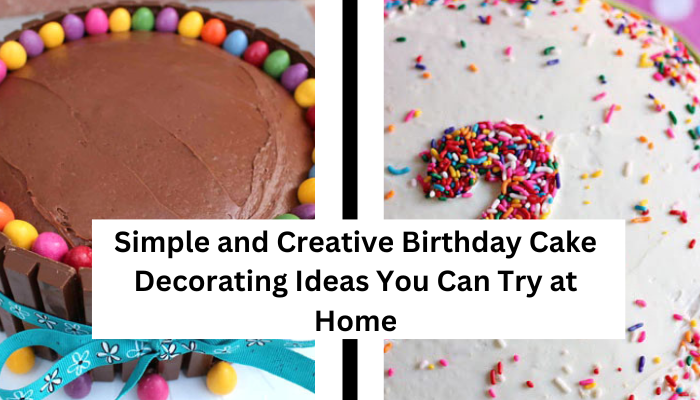
Simple and Creative Birthday Cake Decorating Ideas You Can Try at Home
Easy Birthday Cake Decorating Ideas Anyone Can Do (Even If You’re Not a Pro!)
Decorating a birthday cake doesn’t have to be complicated or require professional skills to look absolutely amazing. With just a few simple cake decorating techniques and a dash of creativity, you can create Pinterest-worthy birthday cakes right in your own kitchen—even if baking isn’t exactly your strong suit!
Advertisement – Continue Reading Below
In this post, I’m sharing fun and easy birthday cake decorating ideas that are perfect for beginners or busy parents. Whether you’re planning a kid’s birthday party, a DIY birthday celebration, or just want a cake that looks as good as it tastes, these ideas are totally doable. From colorful sprinkles and buttercream frosting hacks to minimalist cake toppers and chocolate drip designs, you’ll find ways to make your cake shine without stress.
Now, if you’re staring at a blank cake and wondering “How do I decorate a birthday cake at home?”—you’re not alone. I’ve been there! Honestly, I’m not the best at cake decorating (think more “nailed it” than bakery-perfect), but my kids are the sweetest and always say they love whatever cake I make—even the slightly wonky ones.
Still, I got tired of my cakes looking a bit… meh. So, I went on a mission to find easy birthday cake decorating tips that even a total beginner (like me!) could handle. The result? A list of 20 beautiful yet beginner-friendly cake ideas that are as fun to make as they are to eat.
Let’s dive into these easy ways to decorate a birthday cake that’ll make your next celebration extra special:
Truly Easy Birthday Cakes (That Won’t Drive You Crazy)
Let’s be honest—a lot of cakes claim to be “easy,” but in reality? Only about 25 of them actually earn that title. You know what I’m talking about. You click on a blog post that swears it has easy birthday cake ideas, only to find yourself reading a tutorial that involves homemade fondant, precision piping tips, and a degree in pastry arts.
Take fondant, for example. They say it’s “simple” to tint it six different colors and roll it into perfect shapes. But for most of us? That’s a fast track to a sticky, frustrating mess. And don’t even get me started on piping! I once tried to make an Elmo cake with a star tip… let’s just say Elmo ended up looking like he survived a frosting tornado.
Advertisement – Continue Reading Below
That’s why I decided to pull together 25 truly easy birthday cake decorating ideas that even the most kitchen-challenged among us can tackle. No fancy equipment. No hours spent sweating over buttercream. Just stress-free cake decorating techniques that are actually doable, fun, and yes—still Instagrammable!
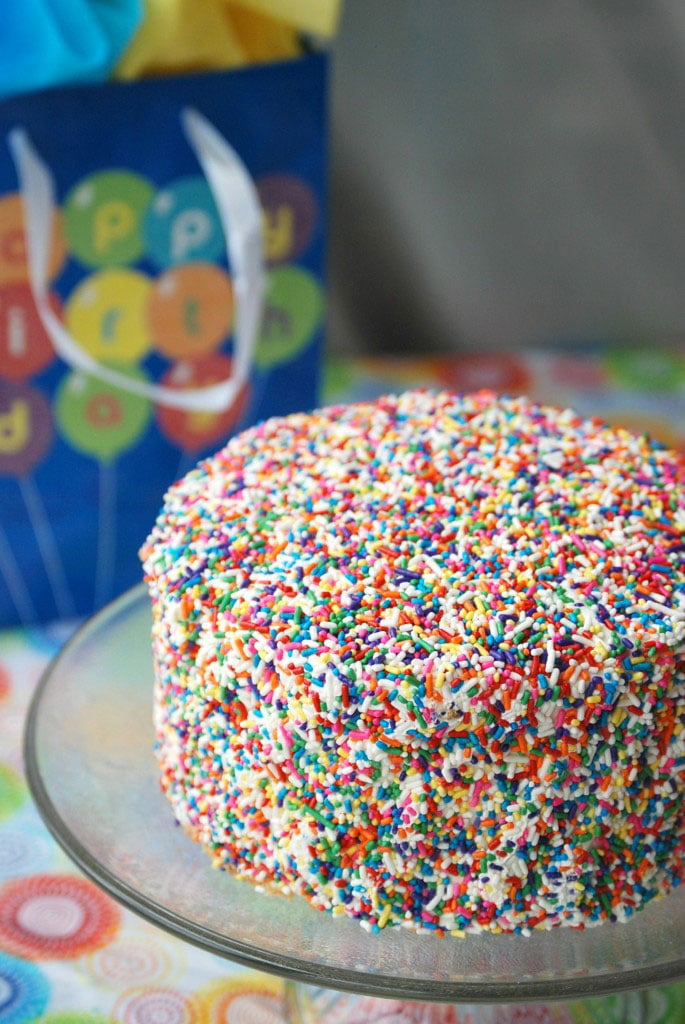
Sprinkle Cake
Here’s a simple guide to making a cake decorated with sprinkles that hides any frosting imperfections:
How to Decorate a Cake with Sprinkles
Ingredients:
- Your favorite cake (homemade or store-bought)
- Frosting (store-bought or homemade)
- A generous amount of sprinkles (any type you like!)
Steps:
- Bake and Cool Your Cake: If you’re making your own cake, bake it according to the recipe and let it cool completely. This is super important; if the cake is warm, the frosting will melt!
- Level the Cake (Optional): If your cake has domed on top, you might want to level it with a knife. This makes for a nicer presentation.
- Frost the Cake: Use a spatula to spread a layer of frosting on the top and sides of your cake. Don’t worry about it being perfect—this is where the sprinkles will come to the rescue!
- Add the Sprinkles: Grab a handful of sprinkles and gently press them onto the sides of the cake. You can do this by pouring the sprinkles onto the cake or using your fingers to place them where you want.
- Finish the Top: If you like, sprinkle some on top too! You can either cover the entire surface or just add a few for a pop of color.
- Serve and Enjoy: Slice it up and serve! Your cake looks festive, and any little frosting flaws are totally hidden by the sprinkles.
Advertisement – Continue Reading Below
Advertisement – Continue Reading Below
🍫 Kit Kat Cake: The Ultimate Easy Birthday Cake That Looks Like a Pro Made It
Looking for a birthday cake idea that looks impressive but is secretly super simple? The Kit Kat Cake is your go-to! This fun and easy chocolate cake decorating idea is perfect for beginners, party planners, or anyone who loves chocolate (so, basically everyone).
With a two-layer chocolate cake, smooth frosting, and a ring of Kit Kat bars around the sides, this cake is a total showstopper. Bonus points for topping it off with colorful candies like M&M’s—it’s crowd-pleasing, kid-approved, and totally Instagram-worthy.
🎂 How to Make a Kit Kat Cake (Step-by-Step)
🛒 Ingredients:
- 1 two-layer chocolate cake (homemade or store-bought)
- 1–2 cups of chocolate or vanilla frosting
- Kit Kat bars (enough to wrap around the cake—around 11–13 full bars)
- Optional: M&M’s, Reese’s Pieces, or sprinkles for the top
👩🍳 Instructions:
1. Bake & Cool Your Cake
If you’re baking from scratch, prepare two 8-inch round chocolate cake layers and let them cool completely. Store-bought cake layers or a boxed cake mix work just fine too—no judgment here!
Advertisement – Continue Reading Below
2. Frost the Cake
Place the first cake layer on a cake stand or serving plate. Add a generous layer of frosting on top, then place the second layer over it. Frost the entire outside of the cake, smoothing out the top and sides. Don’t worry about perfection—it’ll be covered by candy soon!
3. Prep the Kit Kats
Unwrap your Kit Kat bars and break them into individual sticks. You’ll need enough to cover the entire perimeter of the cake.
4. Add the Kit Kats
One by one, gently press each Kit Kat stick vertically onto the sides of the cake. Place them close together so there are no gaps. They’ll stick nicely to the frosting.
Advertisement – Continue Reading Below
5. Decorate the Top
Pour a bunch of M&M’s, chocolate-covered candies, or even gummy bears into the center of the cake. You can match the colors to your party theme for extra flair!
6. Serve & Impress
Tie a ribbon around the cake for a polished look (optional but adorable), slice it up, and prepare for major compliments. This cake is always a crowd favorite—visually stunning and ridiculously tasty.
🎉 Why You’ll Love This Cake:
- No piping skills required
- Kid-friendly and fun
- Perfect for birthdays, bake sales, or chocolate lovers
- Ready in under an hour with minimal effort

Advertisement – Continue Reading Below
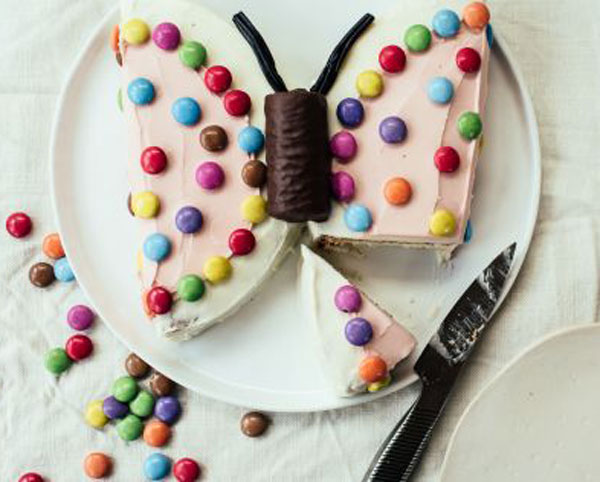
🦋 Butterfly Cake: A Creative and Easy Birthday Cake Idea for Kids
Looking for a fun and whimsical birthday cake idea that’s as pretty as it is simple? This Butterfly Cake is a creative way to turn a basic round cake into a magical masterpiece—no fancy tools or skills required! It’s perfect for kids’ birthday parties, spring celebrations, or anyone who loves butterflies and bright colors.
Advertisement – Continue Reading Below
Using basic ingredients like white buttercream and colorful candies, you can create a butterfly-shaped cake that looks straight out of a fairy tale. Best part? It’s easy enough for beginners or even a fun baking project to do with the kids!
🎂 How to Make a Butterfly Cake
🛒 Ingredients:
- 1 round cake (your favorite flavor—vanilla, chocolate, funfetti, etc.)
- White buttercream frosting (store-bought or homemade)
- Assorted candies (gummy worms, chocolate buttons, sprinkles, sour belts, jelly beans)
- Optional: edible glitter, fruit slices, or candy eyes for extra decoration
👩🍳 Instructions:
1. Bake & Cool Your Cake
Start by baking a single round cake (8 or 9 inches) and allow it to cool completely. This helps prevent crumbs and makes decorating easier.
2. Frost the Cake
Spread a generous layer of white buttercream over the top and sides of the cake. Smooth it out with a spatula or the back of a spoon—no need for perfection here!
3. Cut & Shape the Butterfly
Carefully cut the round cake in half. Then, flip each half so the curved sides face outward and place them side by side on a serving plate to resemble butterfly wings. Leave a small gap in the center for the body.
Advertisement – Continue Reading Below
4. Decorate the Wings
Now the fun begins! Use candies to design colorful patterns on each wing. Place a gummy worm, licorice rope, or a row of chocolate sticks in the center to act as the butterfly’s body. Use candy eyes or sprinkles for fun details. Let your imagination run wild!
5. Add the Finishing Touches
Sprinkle edible glitter or add slices of fruit like strawberries or kiwi for a touch of color and freshness. Want to make it even cuter? Add a small birthday candle or two on the wings!
6. Serve & Celebrate
Once your butterfly cake looks just the way you want, slice it up and serve. It’s a guaranteed crowd-pleaser—and totally Pinterest-worthy.
🧁 Why You’ll Love This Cake:
- No special cake pans required
- Perfect for a butterfly-themed birthday party
- Fun and interactive for kids to help decorate
- Easy, colorful, and completely customizable
Advertisement – Continue Reading Below
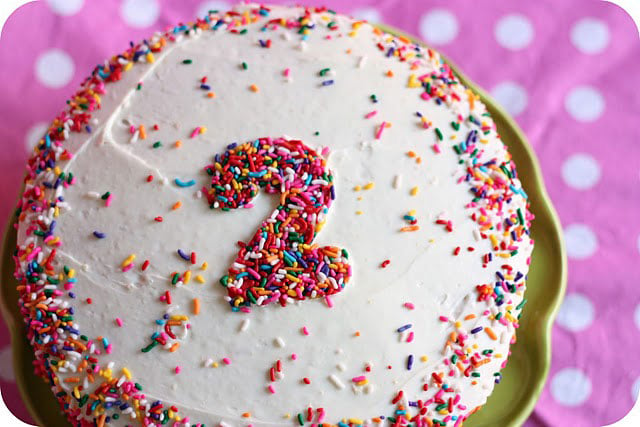
🎉 Sprinkle Number Cake: The Easiest Way to Make a Birthday Cake Pop
Looking for a simple yet eye-catching birthday cake decorating idea? A Sprinkle Number Cake (or any sprinkle shape, really!) is the perfect way to add a festive touch with minimal effort. All you need is a cookie cutter, some colorful sprinkles, and your favorite cake—and voilà, you’ve got a cake that looks custom-made and totally celebration-worthy.
This is a no-stress cake decorating hack that’s perfect for kids’ birthdays, milestone celebrations, or any party where you want to impress without all the fuss.
🎂 How to Make a Cookie Cutter Sprinkle Cake
🛒 Ingredients:
- 1 round or sheet cake (any flavor—store-bought or homemade)
- Your favorite frosting (buttercream, whipped cream, or cream cheese work great)
- Colorful sprinkles (jimmies, nonpareils, sanding sugar, or a mix)
- 1 large cookie cutter (in the shape of a number, heart, star, or letter)
👩🍳 Instructions:
1. Bake & Cool the Cake
If you’re making the cake from scratch, bake it according to your recipe and let it cool completely. This is super important so the frosting doesn’t melt when you decorate.
2. Frost the Cake
Spread a smooth, even layer of frosting over the entire cake—top and sides. Use a spatula or butter knife for a clean finish. White frosting works great as a base, but feel free to use your favorite!
3. Place the Cookie Cutter
Choose your cookie cutter shape—this is where the magic happens! Gently press it into the center (or side) of the cake’s top surface. Make sure it’s snug so the sprinkles stay inside the outline.
4. Fill with Sprinkles
Pour sprinkles inside the cookie cutter, filling it up evenly. Lightly press them down so they stick to the frosting.
5. Carefully Remove the Cutter
Gently lift the cookie cutter off the cake to reveal your sprinkle design! You’ll have a super clean and cute number (or shape) made entirely of sprinkles.
Advertisement – Continue Reading Below
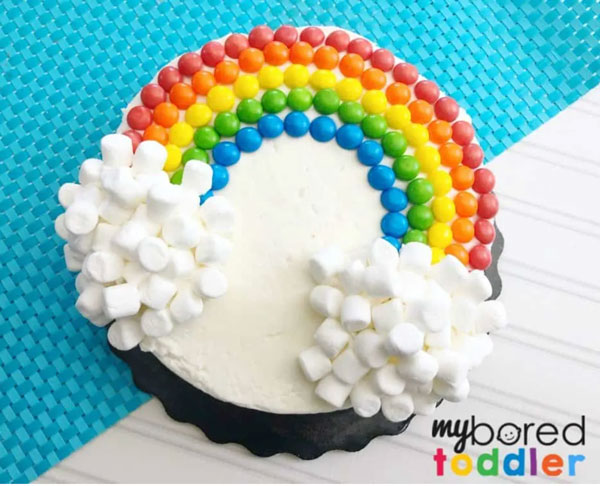
🌈 Rainbow Cake with Skittles and Marshmallows: A Colorful DIY Birthday Cake Idea
Want to brighten up a birthday celebration with minimal effort and maximum wow factor? This Rainbow Cake made with Skittles and mini marshmallows is the ultimate easy birthday cake decorating idea for kids—or anyone who loves a splash of color and a touch of sweetness.
The best part? You can use a store-bought cake and transform it into something magical in under 15 minutes. No baking skills, no piping bags, just candy, frosting, and your creativity!
🎂 How to Make a Rainbow Cake with Skittles and Marshmallows
🛒 Ingredients:
- 1 store-bought cake (any flavor you like—vanilla, chocolate, funfetti, etc.)
- White frosting (or any light-colored frosting for contrast)
- Skittles (separated by color for easier decorating)
- Mini marshmallows
👩🍳 Instructions:
1. Prep Your Cake
Start with your store-bought cake. If it has decorations, you can gently scrape them off or just frost over them with your own frosting. White or pastel-colored frosting works best to make the rainbow pop!
2. Frost the Cake
Spread an even layer of frosting over the top and sides of the cake. Smooth it out with a spatula or butter knife. This gives your Skittles a nice surface to stick to.
3. Create the Rainbow
Start at one side of the cake and place Skittles in a curved, rainbow-like arch across the top. Use classic rainbow order: red, orange, yellow, green, blue, and purple. Gently press each Skittle into the frosting so it stays in place.
4. Add the Clouds
At both ends of the rainbow, pile mini marshmallows to create fluffy clouds. You can cluster them close together for a realistic and adorable touch.
5. Add Extra Flair (Optional)
Sprinkle additional Skittles around the bottom edge of the cake or add edible glitter for extra sparkle. You can even pipe a name or age in frosting beneath the rainbow if you’re feeling fancy.
6. Serve & Enjoy
That’s it! Your colorful rainbow cake is ready to wow your guests. Slice it open and let the “oohs” and “aahs” roll in.
🎉 Why You’ll Love This Cake:
- Perfect for rainbow-themed birthday parties, Pride celebrations, or just for fun
- No baking skills required—great last-minute idea!
- Kid-friendly and easy enough for little helpers to join in
- Uses affordable ingredients and creates big visual impact
Advertisement – Continue Reading Below
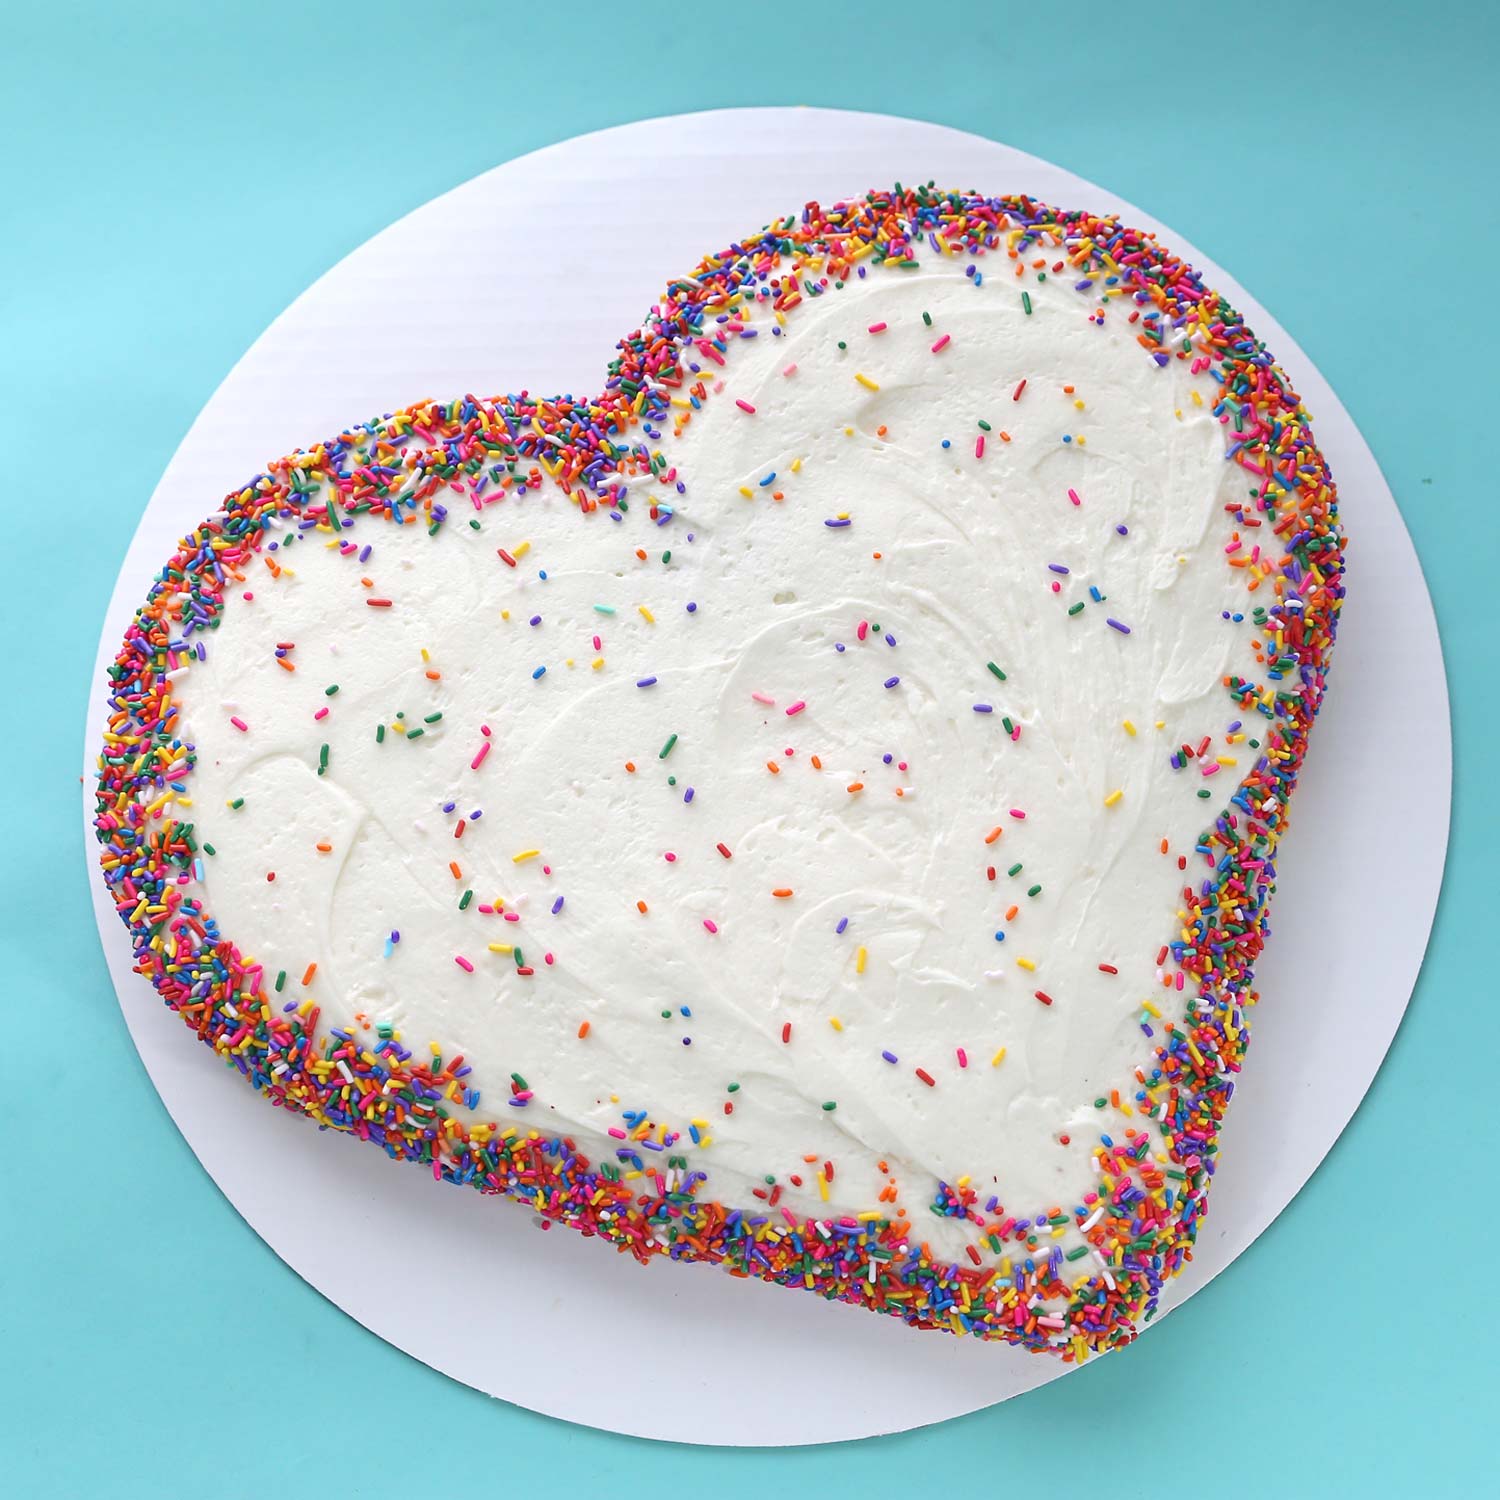
💕 Sweetheart Cake: How to Make a Heart-Shaped Cake Without a Heart Pan
Planning a romantic birthday surprise, a Valentine’s Day treat, or a sweetheart-themed party? You don’t need a fancy pan to make a stunning heart-shaped cake! With just two round cake layers and a few clever cuts, you can create a beautiful DIY heart cake that looks as sweet as it tastes.
This simple method is perfect for beginners and makes a thoughtful homemade dessert for someone you love. Whether you’re baking for a partner, friend, or your little one, this Sweetheart Cake is guaranteed to impress.
🎂 How to Make a Heart-Shaped Cake (No Special Pan Needed!)
🛒 Ingredients:
- 2 round cake layers (any flavor—vanilla, chocolate, red velvet, etc.)
- Frosting of your choice (buttercream, cream cheese, or whipped frosting)
- Optional toppings: sprinkles, chocolate chips, shredded coconut, or fresh berries
👩🍳 Instructions:
1. Bake the Cake
Start by baking two 8-inch round cake layers. Let them cool completely—this is key to easy trimming and decorating.
2. Cut One Layer in Half
Place one cake layer on a cutting board and slice it directly down the middle to create two equal semi-circles.
3. Assemble the Heart Shape
On your cake board or serving plate, position the second (uncut) round cake like a diamond shape (corner pointing down). Then, place the two semi-circles at the top left and right edges of the diamond to form the rounded tops of the heart. You’ll instantly see the heart shape come together!
4. Frost the Cake
Use a spatula to cover the entire cake with frosting, making sure to get into the creases where the pieces meet. This will help everything blend together. Start with a crumb coat if you want a smoother finish.
5. Decorate with Love
Now it’s time to get creative! Add colorful sprinkles, pipe on a border, use heart-shaped candies, or place fresh strawberries around the edges. Want to make it extra special? Write a cute message like “Love You,” “Be Mine,” or the birthday person’s name across the top.
6. Slice & Celebrate
Once your cake is ready, slice it up and enjoy a piece of love! It’s the perfect homemade touch for birthdays, anniversaries, or any day you want to make sweeter.
❤️ Why You’ll Love This Cake:
- No heart-shaped pan needed—just a smart cake hack!
- Perfect for Valentine’s Day cakes, anniversary desserts, or birthday surprises
- Easy to make with store-bought or homemade cake and frosting
- Fun decorating opportunity for kids or couples to do together
Advertisement – Continue Reading Below
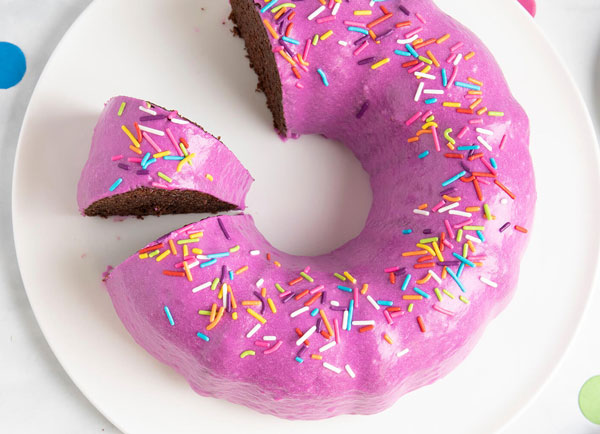
🍩 Giant Donut Cake: The Cutest Bundt Cake You’ll Ever Make
Want to wow your guests with a dessert that looks as fun as it tastes? This Giant Donut Cake is the perfect mix of playful and delicious! Made using a simple bundt cake pan, this cake comes together easily and looks just like an oversized frosted donut—sprinkles and all. It’s ideal for birthday parties, kids’ celebrations, brunches, or anytime you want a treat that’s equal parts adorable and tasty.
Even better? You don’t need any special decorating tools—just a bundt pan, a quick glaze, and your favorite sprinkles!
🎂 How to Make a Bundt Cake That Looks Like a Giant Donut
🛒 Ingredients:
For the Cake:
- 1 bundt cake mix (or your favorite homemade cake recipe)
- Ingredients listed on the box (usually eggs, oil, and water)
For the Donut Glaze:
- 1 cup powdered sugar
- 2–3 tablespoons milk or water
- 1 teaspoon vanilla extract
- Optional: food coloring (for that frosted donut look)
- Sprinkles (rainbow or chocolate jimmies work great!)
👩🍳 Instructions:
1. Preheat the Oven
Set your oven according to the cake mix or recipe instructions—usually around 350°F (175°C).
2. Prep the Bundt Pan
Grease and flour your bundt pan thoroughly to make sure the cake releases cleanly.
3. Mix the Batter
Follow the instructions on your cake mix or homemade recipe. Pour the batter evenly into the prepared bundt pan.
4. Bake the Cake
Bake for 25–35 minutes (check your specific recipe), until a toothpick inserted into the center comes out clean.
5. Cool Completely
Let the cake cool in the pan for 10–15 minutes, then invert it onto a wire rack and cool completely before glazing.
🍓 Make the Glaze:
1. Mix the Glaze
In a small bowl, whisk together 1 cup powdered sugar with 2 tablespoons of milk or water. Add the vanilla extract and food coloring, if using. Adjust the liquid to reach a pourable but slightly thick consistency.
2. Glaze the Cake
Once your bundt cake is cool, drizzle the glaze over the top. Let it naturally drip down the sides to mimic real donut icing.
3. Add the Sprinkles
Before the glaze sets, quickly sprinkle your favorite toppings over the cake. This gives it that fun, frosted donut effect!
✨ Serve & Enjoy
Your giant donut cake is ready to slice, serve, and steal the spotlight. It’s sweet, colorful, and totally unforgettable—perfect for anyone who loves donuts (or just really cute cakes).
🎉 Why You’ll Love This Cake:
- No fancy decorating tools required
- Kid-friendly and great for parties
- Budget-friendly but big on fun
- Totally customizable with flavors, glazes, and toppings
Advertisement – Continue Reading Below
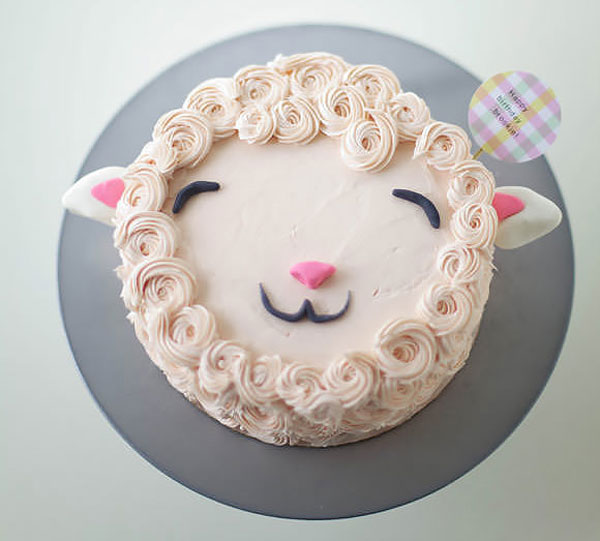
🐑 Fluffy Lamb Cake: An Adorable Easter or Birthday Cake Idea
Looking for a cake that’s as cute as it is delicious? This Fluffy Lamb Cake is the perfect choice for spring parties, baby showers, Easter brunch, or any celebration that could use a little sweetness (and fluff!). It’s surprisingly simple to make—and with a few easy piping techniques, you’ll have a show-stopping centerpiece that looks professionally done.
No fancy pans required—just a round cake, some buttercream, and your creativity!
🎂 How to Make an Adorable Fluffy Lamb Cake
🛒 Ingredients:
- 1 round cake (your favorite flavor—vanilla, chocolate, lemon, or funfetti!)
- White buttercream frosting (store-bought or homemade)
- Chocolate candies (like M&M’s or chocolate chips for the eyes and nose)
- Optional: mini marshmallows or shredded coconut for extra fluff
🧁 Tools:
- Piping bag fitted with a star tip (Wilton 1M or similar)
- Offset spatula or butter knife
- Cake board, plate, or serving platter
👩🍳 Step-by-Step Instructions:
1. Bake & Cool the Cake
Bake your round cake according to your recipe or box mix. Let it cool completely before decorating to prevent melting or sliding frosting.
2. Apply a Crumb Coat
Spread a thin layer of buttercream over the entire cake to lock in crumbs. This doesn’t have to be perfect—it’s just the base layer. Chill the cake for 20–30 minutes to set the frosting.
3. Prepare Your Piping Bag
Fill a piping bag with white buttercream and attach a large star tip (like Wilton 1M). This will give your “wool” that signature swirled, fluffy texture.
4. Pipe the Rosettes
Starting from the bottom edge of the cake, pipe rosettes by swirling the frosting in a spiral motion—start in the center of each swirl and move outward. Work your way up and around the entire cake until it’s covered. It’s okay if some rosettes overlap slightly—imperfections make it cuter!
5. Add the Lamb’s Face
Use two larger chocolate candies for the eyes and a smaller one for the nose. Place them gently in the center or lower third of the cake. Want to add ears? You can use fondant, cookies, or even cut marshmallows.
6. Add Extra Fluff (Optional)
To really amp up the “wooly” look, press mini marshmallows into any open spaces or sprinkle coconut flakes over the top. You can even place some around the base of the cake for a soft, cloud-like effect.
7. Serve & Enjoy
You’ve just made the cutest lamb cake ever! Slice it up and enjoy the smiles—it’s as tasty as it is charming.
🌟 Why You’ll Love This Cake:
- Perfect for Easter cakes, baby showers, or kids’ birthday parties
- Beginner-friendly and totally Instagrammable
- Customizable with different flavors and decorations
- A great way to practice piping rosettes with minimal pressure
Advertisement – Continue Reading Below
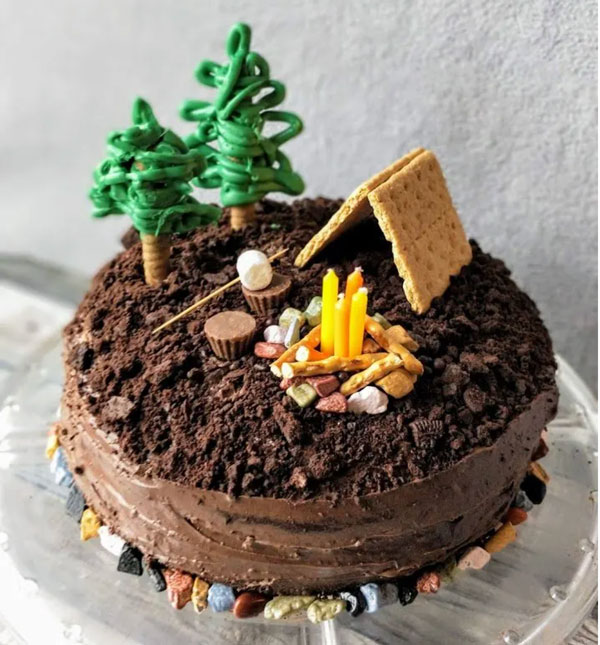
🏕️ Camping Cake: A Fun and Easy Cake Idea for Outdoor Lovers
Planning a camping-themed birthday party, scout celebration, or just want to bring a little adventure indoors? This Camping Cake is the perfect centerpiece for any nature-loving event. With a few simple ingredients and some creative decorating, you can turn a basic round cake into a delicious edible campsite—complete with dirt, a tent, and a campfire!
No advanced baking skills needed—just your imagination and a love for all things outdoorsy.
🎂 How to Make a Camping Cake
🛒 Ingredients:
- 1 round cake (any flavor—chocolate works great for a “dirt” base!)
- Frosting (chocolate or vanilla)
- Oreo cookies (crushed for the dirt effect)
- Graham crackers (to build a tent)
- Orange candies (like gummies or jelly slices for the campfire)
- Optional: green icing or candy melts for grass accents
👩🍳 Step-by-Step Instructions:
1. Bake & Cool the Cake
Start by baking your round cake according to your recipe or box mix. Allow it to cool completely to avoid melting the frosting during decorating.
2. Frost the Cake
Spread a smooth, even layer of frosting over the top and sides of the cake. Chocolate frosting is perfect to simulate soil, but feel free to get creative with color!
3. Add the “Dirt”
Crush Oreo cookies in a plastic bag using a rolling pin or food processor. Sprinkle the crumbs over the frosted cake and gently press to make them stick. This gives your cake a realistic dirt path or forest floor look!
4. Build the Tent
Break graham crackers into rectangles. Form a triangle tent by leaning two pieces together and using a dab of frosting or melted chocolate to hold them in place. You can also lay a cracker flat on the cake and prop two others against it to form an A-frame. Place your tent near the center or off to one side of the cake.
5. Create the Campfire
Arrange orange and red candies in a circular shape in front of the tent to look like flames. Use pretzel sticks or chocolate sticks to act as firewood around the “flames.” It’s a simple but super cute detail!
6. Add Greenery (Optional)
Pipe green icing or sprinkle green candy bits around the base of the cake to mimic grass. You can even use green coconut flakes for a natural touch.
7. Serve & Impress
Your DIY camping cake is ready for the spotlight! Slice it up and enjoy the adventure with every bite.
🔥 Why You’ll Love This Cake:
- Perfect for camping parties, scout troop events, or outdoor-themed birthdays
- Involves fun, interactive decorating the whole family can enjoy
- No fancy tools required—just cookies, candy, and creativity!
- Totally customizable with your favorite snacks and sweets
Advertisement – Continue Reading Below
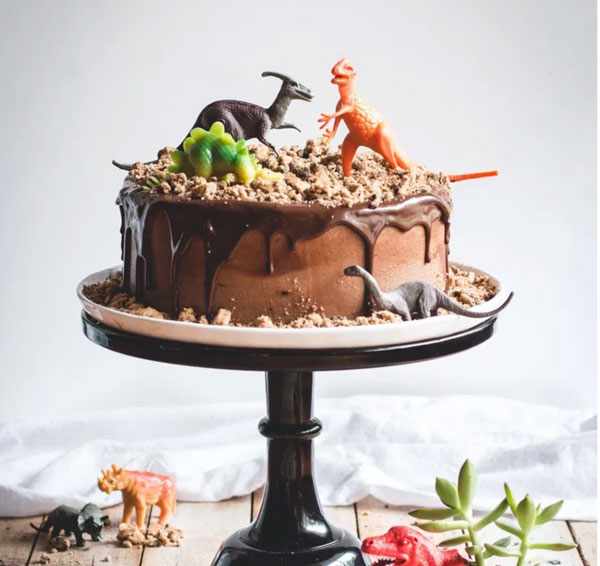
🦖 Chocolate Chip Ahoy Dinosaur Cake: The Ultimate Kid-Friendly Party Cake
Looking to make a roarsome birthday cake that’s fun, chocolatey, and totally unforgettable? This Chocolate Chip Ahoy Dinosaur Cake combines rich frosting, cookie crunch, and adorable dino figurines to create a prehistoric party centerpiece that’s way easier than it looks!
Perfect for dinosaur-themed birthdays, boys’ or girls’ parties, or any kid who’s obsessed with Jurassic vibes, this cake uses easy store-bought elements (plus a quick homemade frosting and ganache) to deliver major wow factor—without the stress.
🎂 How to Make a Chocolate Chip Ahoy Dinosaur Cake
🛒 Ingredients:
For the Cake:
- 1 round chocolate cake (homemade or boxed mix, baked and cooled)
For the Quick Chocolate Frosting:
- 1 cup unsalted butter (softened)
- 3–4 cups powdered sugar
- 1/2 cup cocoa powder
- 1/4 cup milk
- 1 tsp vanilla extract
For the Quick Chocolate Ganache:
- 1 cup chocolate chips
- 1/2 cup heavy cream
For Decorating:
- Chips Ahoy cookies (whole or crumbled)
- Mini dinosaur figurines
- Optional: crushed Oreos for “dirt,” green icing for “grass,” or candy rocks
👩🍳 Step-by-Step Instructions:
1. Bake the Cake
Use your favorite chocolate cake recipe or a boxed mix. Bake it in a round pan and allow it to cool completely before decorating.
2. Make the Chocolate Frosting
In a bowl, beat the softened butter until creamy. Gradually add powdered sugar and cocoa powder. Pour in the milk and vanilla extract, then beat until smooth and fluffy.
3. Frost the Cake
Spread an even layer of frosting over the top and sides of the cake. You can smooth it out or use your spatula to create textured, “rocky” swirls—either way, it’s dino-approved!
4. Make the Ganache
Heat the cream in a small saucepan until it begins to simmer. Remove from heat and stir in chocolate chips until fully melted and glossy. Let it cool slightly before drizzling.
5. Decorate with Cookies
Press Chocolate Chip Ahoy cookies around the bottom edge of the cake to mimic rocky terrain. You can also break some into pieces and place them on top or around the dino figurines.
6. Add the Dinosaurs
Place mini dinosaur toys on top of the cake. Create a fun scene with them stomping through the cookie rubble or gathering around the center for a playful look.
7. Drizzle the Ganache
Pour or spoon the ganache over the top of the cake, letting it drip down the sides for a dramatic (and delicious) effect.
🦕 Optional Extra Touches:
- Add crushed Oreos for dirt
- Pipe green icing tufts as grass or use green coconut
- Use candy rocks or chocolate pebbles for extra prehistoric flair
🎉 Why You’ll Love This Cake:
- No fancy decorating skills needed
- Perfect for dinosaur birthday parties
- Kid-approved flavors (cookies + chocolate = YES!)
- Customizable with toys, candies, or themed decorations
Advertisement – Continue Reading Below
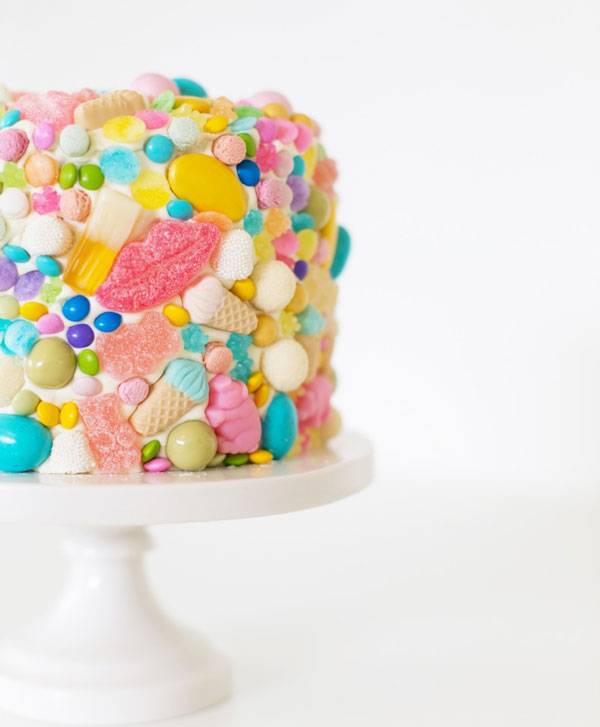
🍭 Candy Cake: A Fun and Easy Way to Decorate a Birthday Cake
Looking for a show-stopping birthday cake that’s colorful, creative, and beyond easy to make? This Candy-Covered Cake is the ultimate treat for candy lovers of all ages! With just a boxed cake mix, frosting, and your favorite sweets, you can create a stunning dessert that’s perfect for birthdays, holidays, or candy-themed parties.
Whether you love M&M’s, gummy bears, licorice, or chocolate bars—this cake gives you total freedom to decorate however you like. And the best part? No decorating skills required!
🎂 How to Make a Candy Cake at Home
🛒 Ingredients:
- 1 box cake mix (any flavor—chocolate, vanilla, funfetti, etc.)
- Ingredients for the mix (usually eggs, oil, and water)
- Frosting (store-bought or homemade buttercream)
- Assorted candies (M&M’s, gummy bears, chocolate bars, sour candies, jelly beans, etc.)
- Optional: pretty cake stand for presentation
👩🍳 Instructions:
1. Bake the Cake
Prepare your cake mix according to the package directions. You can use one round pan for a single layer or divide it into two layers for extra height. Let the cake cool completely before decorating.
2. Frost the Cake
Once your cake is cool, spread a smooth, even layer of frosting over the top and sides. This helps the candy stick and keeps the cake moist. Vanilla or chocolate frosting both work great as a base.
3. Choose Your Candy
Grab an assortment of your favorite candies. Think colorful M&M’s, mini candy bars, gummy worms, jelly beans, Skittles, or sour belts. Mix different shapes and sizes for visual interest.
4. Decorate the Cake
Start pressing candies gently into the frosting. You can go for a full-on rainbow explosion, create stripes or geometric patterns, or even do themed decorations (like pink candies for a princess cake or chocolate pieces for a s’mores vibe).
5. Add Final Touches
Scatter extra candy around the base of the cake on your cake plate or stand for added flair. You can also top with whipped cream, drizzle chocolate syrup, or add a colorful cake topper!
6. Display & Serve
Carefully place the cake on a cake stand or serving platter. It instantly becomes a centerpiece! Then slice it up and enjoy the sweet, candy-filled surprise inside.
🍬 Why You’ll Love This Candy Cake:
- Perfect for candy-themed birthday parties or holidays like Halloween and Easter
- Kid-approved and super fun to decorate together
- Completely customizable with any candy combo
- Beginner-friendly—no baking or decorating experience needed
Advertisement – Continue Reading Below
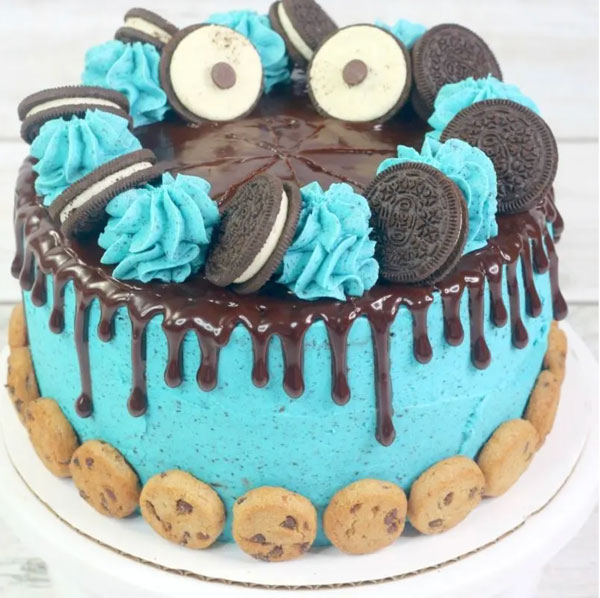
🍪 Easy Cookie Monster Cake: No Piping Bags Needed!
Looking to make a cute and fun Cookie Monster cake without the stress of piping fur for hours? You’re in luck! This easy Cookie Monster cake uses simple decorating tricks and store-bought ingredients to create an adorable, kid-friendly dessert that’s perfect for birthday parties, Sesame Street themes, or any Cookie Monster fan.
No fancy tools required—just cookies, blue frosting, and a little creativity!
🎂 How to Make a Simple Cookie Monster Cake
🛒 Ingredients:
- 1 round cake (any flavor—homemade or store-bought)
- Blue frosting (tinted vanilla or buttercream)
- Chocolate cookies (Oreos, Chips Ahoy, or your favorite)
- Black fondant or small chocolate candies (for the eyes)
- Optional: cake stand or cake board for presentation
👩🍳 Step-by-Step Instructions:
1. Bake & Cool the Cake
Bake a round cake using your favorite recipe or a cake mix. Let it cool completely before decorating to avoid melting the frosting.
2. Frost with Blue Frosting
Cover the entire cake with blue frosting. You don’t need it perfectly smooth—a little texture actually helps mimic Cookie Monster’s fuzzy look! Use a spatula or spoon to swirl the frosting for extra fun texture.
3. Make Cookie Monster’s Face
- Eyes: Use two large chocolate cookies or white fondant circles for the eyeballs. Place them near the top of the cake, angled slightly for that classic goofy Cookie Monster look.
- Pupils: Add small black fondant dots or chocolate chips to each eye. Position them slightly off-center to give him that playful, wide-eyed expression.
- Mouth: Use a chocolate cookie broken in half or pipe a simple curved line with black frosting to create a mouth shape. You can also press a whole cookie into the cake as if he’s munching on it!
4. Add Cookie Crumbs
Crush extra cookies and sprinkle them around the base of the cake or over the top to make it look like Cookie Monster’s been snacking (because of course he has!).
5. Display & Serve
Place your cake on a decorative cake stand or plate, and get ready for the smiles. This cake is as fun to look at as it is to eat!
🎉 Why You’ll Love This Cookie Monster Cake:
- No piping skills required
- Perfect for Sesame Street parties or kids’ birthdays
- Uses easy-to-find ingredients
- Customizable with your favorite cookies and frosting
Advertisement – Continue Reading Below