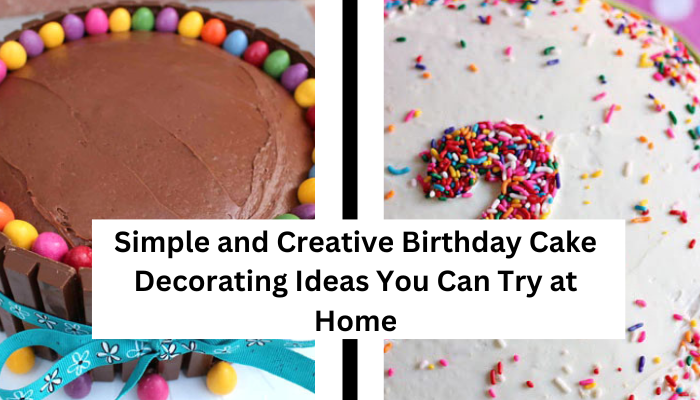
Simple and Creative Birthday Cake Decorating Ideas You Can Try at Home
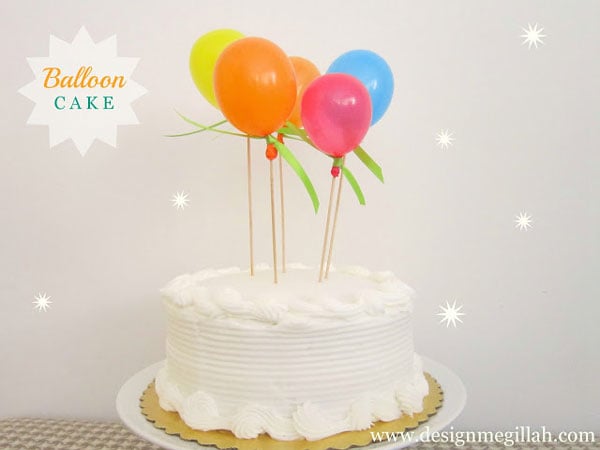
🎈 Easy Balloon Cake: A Fun and Festive Cake Decoration with Water Balloons
Want to make a show-stopping birthday cake without complicated piping or fondant? This Balloon Cake is the perfect easy birthday cake idea that’s bright, cheerful, and super simple to create! Using colorful water balloons and wooden skewers, you can turn any plain cake into a party-ready masterpiece in just minutes.
This decorating hack is perfect for kids’ birthday parties, baby showers, first birthdays, or any event that calls for fun and color—with zero stress.
Advertisement – Continue Reading Below
🎂 How to Make a Balloon Cake Topper (No Helium Required!)
🛒 Ingredients & Materials:
- 1 plain white cake (store-bought or homemade)
- Water balloons (in assorted bright colors)
- Wooden skewers (cut to size)
- Optional: extra frosting or sprinkles for added flair
👩🍳 Step-by-Step Instructions:
1. Prepare Your Cake
Start with a smooth, frosted cake. White buttercream works great as a neutral base, but feel free to go with pastel or bold-colored frosting for extra fun. Make sure the surface is clean and flat for decorating.
2. Inflate the Balloons
Blow up water balloons to small, round sizes—these mimic mini party balloons and look adorable clustered on top of a cake. Tie each one securely to keep the air in.
3. Trim Your Skewers
Cut the wooden skewers to various lengths. You’ll want a mix of heights to create a balloon bouquet effect. Leave enough skewer at the bottom to insert into the cake securely.
4. Attach Balloons to Skewers
Carefully stretch and slide the tied end of each balloon over the top of a skewer. Push it down slightly so it stays put. You can group 2–3 balloons on one skewer for a clustered look or keep them single for a scattered, airy design.
5. Insert Into the Cake
Stick each balloon-topped skewer into the top of the cake, arranging them like a balloon bouquet. Angle them slightly or bunch them together for a festive, whimsical display!
6. Optional Decorating Touches
Add piped frosting details around the base of the balloons, sprinkle some edible confetti, or add a mini bunting banner between the balloons to make it even more party-ready.
Advertisement – Continue Reading Below
7. Serve & Celebrate!
Your easy balloon cake is now ready to be the star of the dessert table! Slice it up and enjoy the smiles all around.
🎉 Why You’ll Love This Balloon Cake Idea:
- No fancy tools or skills needed
- Eye-catching and totally Instagrammable
- Great for DIY birthday cake designs
- Customizable with any color scheme or party theme
- Quick to assemble—perfect for last-minute party prep!
Pro Tip: Want to match your balloons to your party theme? Use pastel balloons for a baby shower, rainbow colors for a kids’ birthday, or metallics for a more modern look!
Advertisement – Continue Reading Below
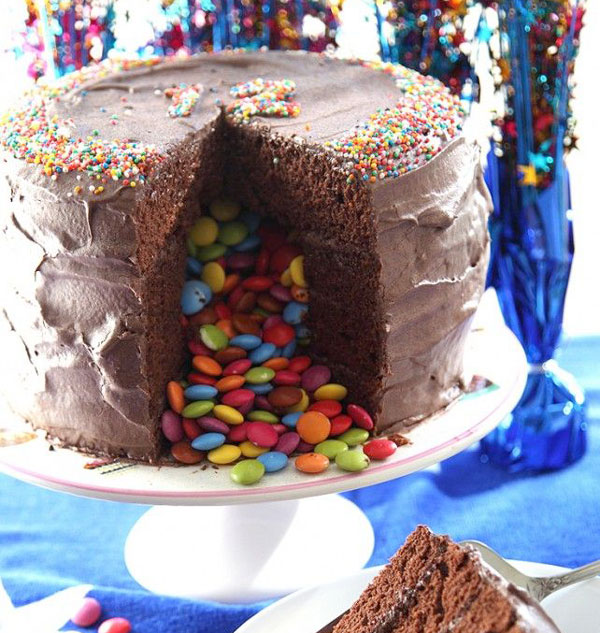
🎉 Piñata Cake: The Birthday Surprise Cake Kids Will Love!
Want to score major mom points? A Piñata Cake is the ultimate birthday cake that combines fun, surprise, and sweetness! It’s a show-stopping centerpiece that looks like a regular cake—until you cut into it and a flood of colorful candies spills out. 🎊
Whether you’re baking from scratch or using store-bought layers, this easy piñata cake tutorial will walk you through every step. Perfect for kids’ parties, themed celebrations, or anyone who loves a sweet surprise!
Advertisement – Continue Reading Below
🎂 How to Make an Easy Piñata Cake
🛒 Ingredients:
- 2 round cakes (store-bought or homemade)
- Frosting (buttercream or cream cheese)
- Food coloring (optional)
- Mini candies (like M&M’s, Skittles, gummies, or mini marshmallows)
- Decorations (sprinkles, cake toppers, themed picks)
- Optional: edible glitter, mini banner, or custom cake knife
👩🍳 Steps:
1. Bake and Cool the Cakes
Bake two 8-inch round cakes and let them cool completely. If you’re using store-bought cakes, skip ahead!
2. Hollow Out the Center
Use a small round cookie cutter or a knife to cut a hole in the center of one cake layer (don’t go all the way through the bottom). This will hold the candy.
3. Add the Candy Surprise
Place the cake with the hole onto your cake stand or board. Fill the center cavity with your chosen mini candies. Make sure it’s filled to the top but not overflowing.
Advertisement – Continue Reading Below
4. Frost and Stack
Spread frosting around the top edge of the candy-filled cake. Place the second cake layer on top and gently press to seal. Frost the entire cake, covering the seam and smoothing the top and sides.
5. Decorate
Go wild with sprinkles, themed cake toppers, or even a color-coordinated candy border. You can match it to your party theme—superheroes, unicorns, jungle animals, etc.
6. Add the Final Touches
Stick in a mini “Happy Birthday” banner or use a themed cake knife for cutting—it’s all about the experience!
Advertisement – Continue Reading Below
7. Let the Birthday Kid Cut the Cake
The best part? Letting your child slice into the cake and watching their face light up as the surprise candy spills out!
🎉 Why You’ll Love This Cake:
- Easy to make with store-bought layers
- Customizable with any candy or theme
- Great for wow-worthy party moments
- Perfect for all ages—from toddlers to teens!
Advertisement – Continue Reading Below
🎀 Mickey Mouse Rosette Cake: A Simple and Stunning Party Cake
If you’re planning a Mickey Mouse birthday party or want a charming cake that looks bakery-made without special tools, this Rosette Cake is perfect! With just a piping bag and star tip (or even a zip-top bag!), you can create a cake that’s both elegant and playful.
Rosettes are quick to pipe and look amazing—even if you’re a beginner!
Advertisement – Continue Reading Below
🎂 How to Make a Mickey Mouse-Inspired Rosette Cake
🛒 Ingredients:
- 1 round cake (your choice of flavor)
- Buttercream frosting
- Food coloring (red, yellow, black, or any theme colors)
- Optional: edible glitter, Mickey toppers, or sugar pearls
🧁 Tools:
- Piping bag (or zip-top bag)
- Star tip (Wilton 1M is ideal, but not required)
👩🍳 Steps:
1. Bake and Cool the Cake
Bake your cake and allow it to cool completely. Level the top if needed for an even surface.
2. Apply the Crumb Coat
Spread a thin layer of frosting over the entire cake to seal in crumbs. Chill for 30 minutes.
3. Color Your Frosting
Divide your buttercream into small bowls and mix in food coloring to match your theme (like red, yellow, and black for Mickey Mouse).
4. Fill the Piping Bag
Place your colored frosting into the piping bag with the star tip. If using a zip-top bag, snip a corner off at an angle.
Advertisement – Continue Reading Below
5. Pipe the Rosettes
Start from the center of each rosette and swirl outward in a circular motion. Continue piping rosettes all over the top and sides of the cake. Alternate colors for a fun, festive look.
6. Decorate and Finish
Add Mickey ears, sugar pearls, sprinkles, or a birthday topper. You can even use fondant or paper cutouts to add little Mickey silhouettes between the rosettes.
7. Serve and Enjoy
Your beautiful Mickey-inspired rosette cake is ready to wow the party crowd! Slice it up and soak in the compliments.
🧁 Why You’ll Love This Cake:
- Elegant yet playful
- Great for Mickey or Disney-themed parties
- Beginner-friendly with big visual impact
- Customizable with colors, toppers, or character details

Advertisement – Continue Reading Below
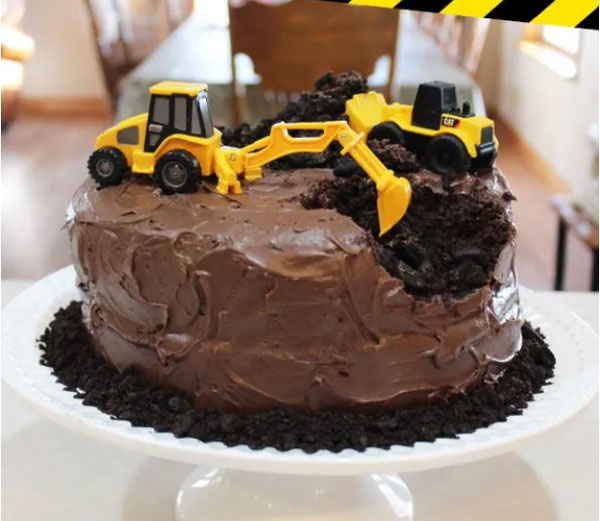
🚧 Simple Construction Cake: A Fun Cake Idea for Little Builders
If your child loves dump trucks, dirt, and digging, this construction-themed cake is the perfect way to celebrate! Made with chocolate cake, crushed Oreos, and mini construction toys, this cake looks like a mini worksite—and it’s ridiculously easy to put together.
🛠️ How to Make a Construction Cake
Ingredients:
- 1 chocolate cake (store-bought or homemade)
- Chocolate frosting
- Crushed Oreos (for “dirt”)
- Mini construction toys (trucks, cones, diggers, etc.)
- Optional: gummy worms, candy rocks, or sprinkles
Steps:
- Bake and Cool your chocolate cake.
- Frost the Cake with a thick layer of chocolate frosting.
- Sprinkle Crushed Oreos generously over the top and sides to look like dirt.
- Decorate with Toys – position mini trucks as if they’re digging or dumping Oreo dirt.
- Optional Extras – add candy rocks or gummy worms for more fun.
- Serve and Enjoy! Perfect for a birthday party or themed event.
Advertisement – Continue Reading Below
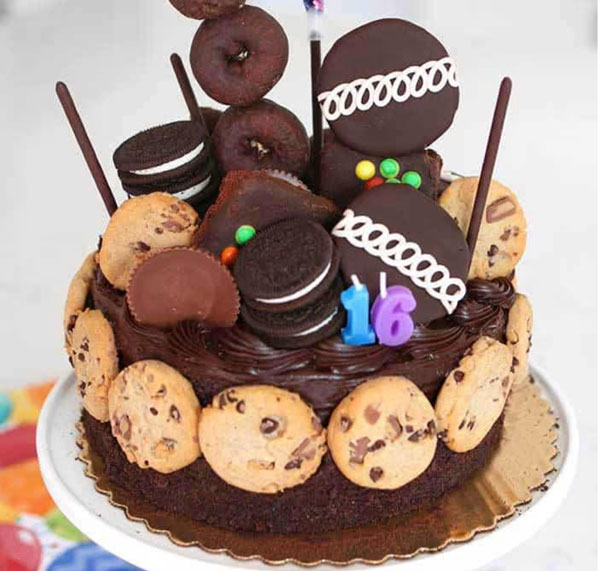
🍫 Ultimate Chocolate Cake: Decorated with Your Child’s Favorite Treats
Short on time but still want to impress? This ultimate chocolate overload cake turns a plain store-bought cake into a masterpiece—just by piling on your kid’s favorite chocolate treats!
🍬 How to Make a Chocolate-Lover’s Dream Cake
Ingredients:
- 1 store-bought cake (vanilla or chocolate)
- Assorted chocolate bars and candy (Snickers, Kit Kat, M&M’s, Reese’s, etc.)
- Optional: extra frosting or chocolate drizzle
Steps:
- Choose Your Cake and set it on a cake stand or platter.
- Remove Decorations (if needed) and add fresh frosting.
- Top with Chocolate Treats – start with larger pieces and fill in with smaller ones.
- Drizzle Melted Chocolate for extra decadence (optional).
- Add Sprinkles or Glitter for a party-ready finish.
- Serve and Wow! A no-fuss, kid-approved dessert.
Advertisement – Continue Reading Below
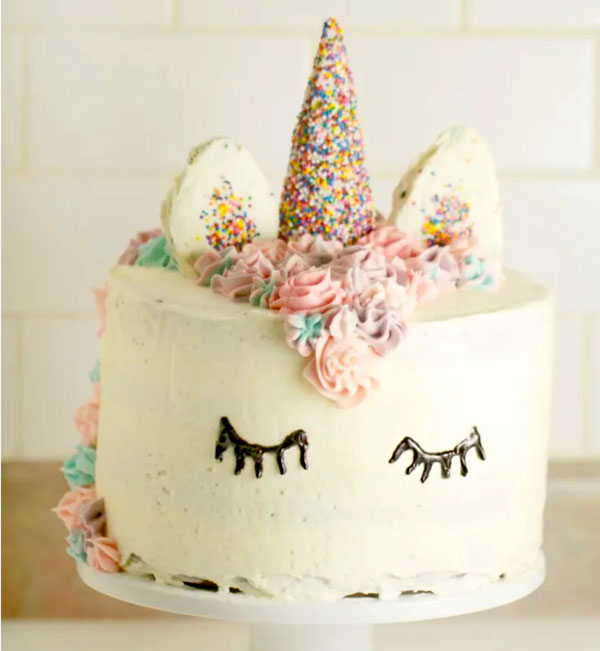
🦄 Unicorn Cake: Cute, Colorful, and Surprisingly Simple
This unicorn cake is as magical as it is easy! Using an ice cream cone for the horn and colorful buttercream for the mane, this cake is a guaranteed crowd-pleaser at any unicorn or fairy-themed party.
🌈 How to Make a Unicorn Cake
Ingredients:
- 1 round cake (any flavor)
- Buttercream frosting (white + pastel colors)
- 1 ice cream cone (for the horn)
- Edible glitter or sprinkles
- Candy or fondant (for ears and eyes)
Steps:
- Bake and Frost the Cake using white buttercream as a base.
- Insert the Ice Cream Cone upside down in the center for the horn.
- Pipe Rosettes in pink, purple, and blue to create the mane.
- Add Ears made of fondant or candy near the horn.
- Create the Face with candy eyes and a piped smile.
- Finish with Glitter and colorful sprinkles for a magical effect.
- Serve and Shine! Perfect for little dreamers.
Advertisement – Continue Reading Below
🎉 Piñata Cake: Surprise Inside = Guaranteed Smiles
Take your party cake to the next level with a piñata cake—a sweet surprise that spills out candy when you cut it! It’s easier than you think and makes a big impression at any birthday celebration.
🎂 How to Make a Piñata Cake
Ingredients:
- 2 round cakes (any flavor)
- Frosting (buttercream works great)
- Mini candies (M&M’s, Skittles, gummies, etc.)
- Food coloring (optional)
- Decorations (sprinkles, cake topper, banner)
Steps:
- Bake Two Cakes and cool them completely.
- Cut a Hole in the center of one cake layer.
- Fill with Candy, then top with the second layer.
- Frost the Whole Cake and smooth it out.
- Decorate Freely – add sprinkles, glitter, or themed toppers.
- Slice for the Surprise! Watch everyone’s excitement as candy pours out.
Advertisement – Continue Reading Below
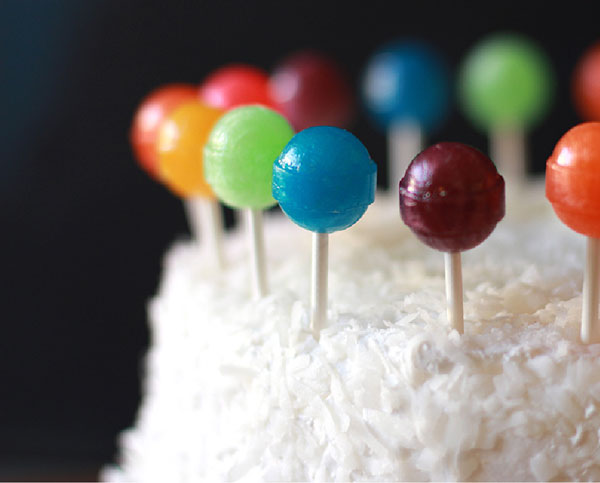
🍭 Rainbow Lollipop Cake: A Polka-Dot Party Showstopper
Looking for a cake that’s bright, playful, and super easy to decorate? This Rainbow Lollipop Cake is a show-stopping centerpiece perfect for kids’ birthday parties, rainbow-themed celebrations, or candy buffets. The best part? No piping or fancy tools required!
🎂 How to Make a Polka-Dot Lollipop Cake
Ingredients:
- 1 round cake (any flavor)
- Frosting (buttercream or cream cheese)
- Colorful lollipops (Dum Dums work great!)
- Optional: sprinkles or edible glitter
Steps:
- Frost your cooled cake with a smooth layer of icing.
- Unwrap lollipops and insert them evenly into the cake in a polka-dot pattern.
- Add sprinkles or edible glitter for extra sparkle.
- Serve and enjoy the smiles!
Advertisement – Continue Reading Below
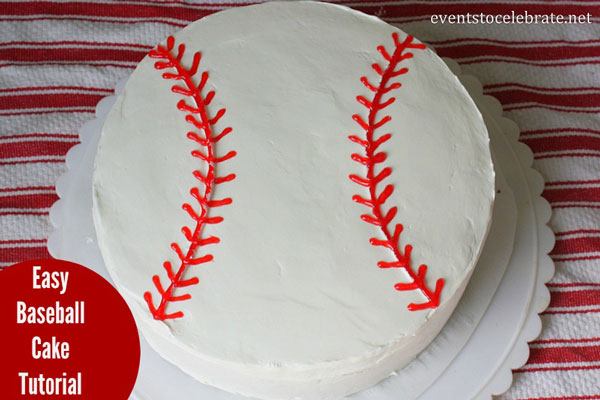
⚾ Baseball Cake: Perfect for Little Sluggers
This Easy Baseball Cake is a home run for any sports fan! It’s a classic design using simple red icing or gel to create baseball stitches—no need for a cake artist here.
🎂 How to Make a Baseball Cake
Ingredients:
- 1 round cake (any flavor)
- White frosting
- Red frosting or edible gel
Steps:
- Frost the entire cake in white.
- Pipe two curved red lines to mimic baseball stitching.
- Add short perpendicular stitches along the curves.
- Serve and celebrate with your favorite MVP!
Advertisement – Continue Reading Below
🏀 Basketball Cake with Reese’s Pieces: Slam Dunk Sweetness
This Basketball Cake uses Reese’s Pieces for a fun and edible design. It’s bold, bright, and full of peanut buttery goodness—perfect for NBA fans, birthday boys, or March Madness parties.
🎂 How to Make a Reese’s Basketball Cake
Ingredients:
- 1 round cake (any flavor)
- Orange frosting
- Reese’s Pieces
- Black frosting or edible gel
Steps:
- Frost the cake in orange.
- Arrange Reese’s Pieces in a basketball pattern or scatter them.
- Pipe black lines to mimic basketball seams.
- Serve with high fives all around!

Advertisement – Continue Reading Below
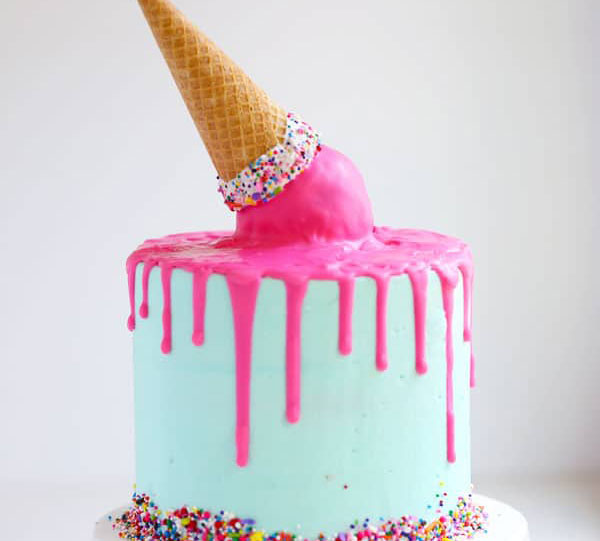
🍦 Upside-Down Ice Cream Cone Cake: A Sweet Illusion
This Ice Cream Cone Cake looks like a melting scoop on your cake—and it’s adorable! Use a real cone and colorful frosting to create a fun 3D dessert that’s perfect for summer parties or ice cream-themed birthdays.
🎂 How to Make an Upside-Down Ice Cream Cake
Ingredients:
- 1 vanilla cake
- Buttercream frosting (any color)
- Ice cream cones (regular or mini)
- Optional: sprinkles, chocolate chips, edible glitter
Steps:
- Trim cake into a dome shape.
- Place a cone upside down on top.
- Frost the dome with swirls or peaks to mimic ice cream.
- Add sprinkles for a playful touch.
Advertisement – Continue Reading Below
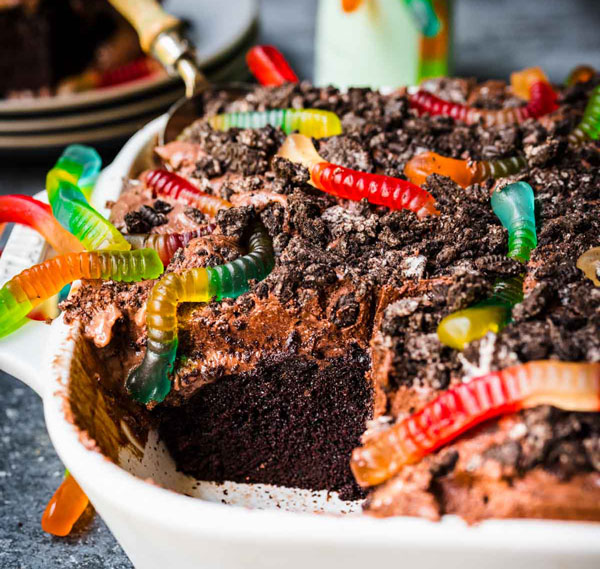
🛠️ Simple Construction Cake: Delicious Dirt and Trucks
This Construction Cake is made for little builders! With crushed Oreos for dirt and toy trucks digging on top, it’s a super fun cake for toddler birthdays, construction parties, or digger fans.
🎂 How to Make a Construction Cake
Ingredients:
- 1 chocolate cake
- Chocolate frosting
- Crushed Oreos
- Mini construction toys
Steps:
- Frost your cake with chocolate frosting.
- Sprinkle crushed Oreos to create “dirt.”
- Place mini toy trucks, cones, and workers.
- Serve and let the fun begin!
Advertisement – Continue Reading Below
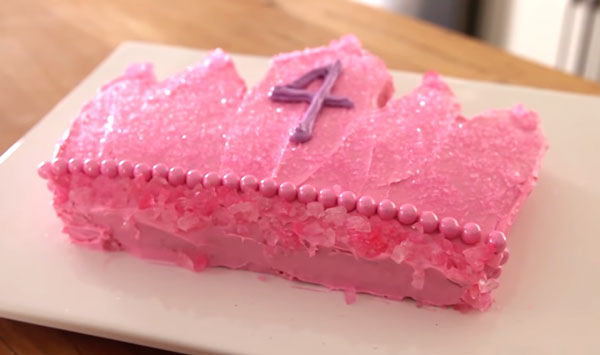
👑 Princess Crown Cake: A Magical DIY Cake for Your Little Royal
Throwing a princess-themed birthday party? This Princess Crown Cake is the perfect centerpiece fit for royalty! Using a simple 9×13-inch cake, a few basic decorating tools, and a sprinkle of creativity, you can create a stunning crown-shaped cake that looks straight out of a fairy tale—no special cake pans required.
This cake is ideal for princess parties, Disney-themed birthdays, or any little one who dreams of tiaras, magic, and glitter!
🎂 How to Make a Princess Crown Cake (Step-by-Step)
🛒 Ingredients:
- 1 (9×13 inch) cake (any flavor—vanilla, strawberry, or chocolate)
- Buttercream frosting (pink, purple, yellow, or your princess color of choice)
- Edible gold or silver spray (optional, for a royal shimmer)
- Candy jewels or edible decorations (gumdrops, pearls, edible glitter)
- Optional: fondant (to cut stars, hearts, or flowers)
👩🍳 Instructions:
1. Bake and Cool the Cake
Bake your cake in a 9×13-inch pan using your favorite recipe or boxed mix. Let it cool completely before decorating to prevent melting or sliding frosting.
2. Cut Out the Crown Shape
Use a serrated knife to carefully cut the cake into a crown shape:
- Sketch the shape on parchment or print a crown template for guidance.
- Create 3 to 5 peaks at the top for the crown points and a curved bottom edge.
Tip: Freeze the cake for 15–20 minutes before cutting for cleaner lines.
3. Frost the Cake
Cover the entire cake with your chosen buttercream color. Use a spatula to smooth it out or create whimsical swirls and textures.
4. Add the Royal Decorations
- Lightly spray the cake with edible gold or silver mist for a shimmering effect.
- Decorate the peaks and edges with candy jewels, edible pearls, or sprinkles.
- Add stars, hearts, or flowers made of fondant for extra flair.
5. Final Touches (Optional)
Pipe a decorative border around the bottom or the crown tips using a star tip. Add a cute “Happy Birthday” topper or your child’s name in edible letters!
6. Serve and Celebrate
Place your cake on a fancy cake stand or platter, gather your party guests, and let the royal celebration begin. Slice it up and enjoy this magical treat!
💖 Why You’ll Love This Princess Crown Cake:
- No special pan or tools needed
- Customizable with any color or theme (Frozen, Belle, Barbie—you name it!)
- A creative way to turn a simple sheet cake into something spectacular
- Perfect for DIY party planners and baking beginners
✨ Pro Tip:
Want to make it even more magical? Surround the cake with fairy lights or sprinkle edible glitter on the plate for a sparkling effect that’ll wow your guests.
Advertisement – Continue Reading Below
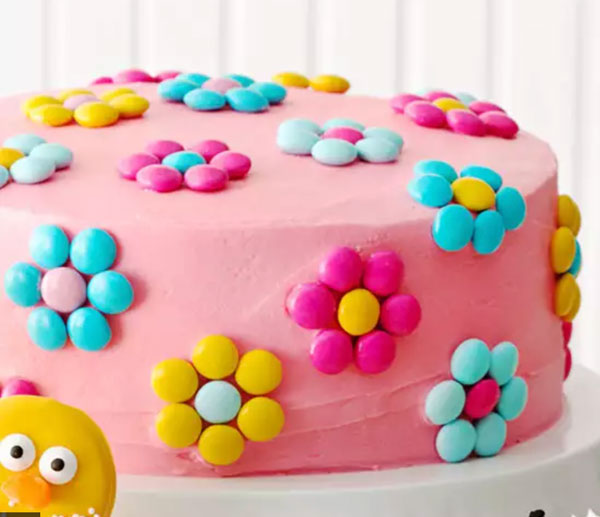
🌼 M&M Flower Cake: A Fun and Easy DIY Cake Decorating Idea
Looking for a cheerful, beginner-friendly cake that’s bursting with color and charm? This M&M Flower Cake is as easy as it is adorable! Using colorful M&M candies and simple buttercream frosting, you can transform a plain cake into a garden of candy flowers—no piping skills required.
Perfect for spring celebrations, birthday parties, Mother’s Day, or a sweet just-because treat, this cake is sure to brighten anyone’s day.
🎂 How to Make a Simple Flower Cake with M&Ms
🛒 Ingredients:
- 1 round cake (any flavor—vanilla, chocolate, lemon, etc.)
- Buttercream frosting (choose a color to match your theme)
- M&Ms in various colors
- Optional: green frosting or green fondant for leaves
👩🍳 Step-by-Step Instructions:
1. Bake and Cool the Cake
Bake your cake using a favorite recipe or a boxed mix. A standard 8- or 9-inch round cake works great. Let it cool completely before decorating.
2. Frost the Cake
Spread a smooth, even layer of buttercream frosting on the top and sides of the cake. You can keep it simple with white, or go bold with pastel pink, light blue, or yellow to enhance the springtime vibe.
3. Make M&M Flowers
- Choose 5–6 M&Ms of one color to form the petals of each flower.
- Arrange them in a circle on the cake’s surface.
- Place a different-colored M&M in the center for the flower’s core.
Repeat this process to create multiple flowers across the cake. You can cluster them together or scatter them for a more whimsical, garden-like look.
4. Add Leaves (Optional)
- Pipe simple leaves with green frosting around the flowers using a leaf tip or a small round tip.
- Alternatively, use green fondant to cut out leaf shapes and press them onto the frosting.
5. Final Touches
You can add edible glitter, sugar pearls, or sprinkles around the flowers to enhance the design—or keep it clean and classic. Either way, it’ll be stunning.
6. Serve and Enjoy!
Your candy flower cake is ready to charm the crowd! Slice it up and enjoy the combo of soft cake, smooth frosting, and crunchy candy.
Advertisement – Continue Reading Below
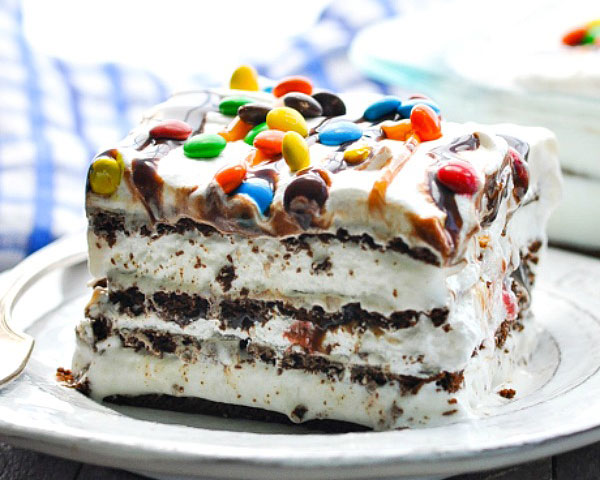
🍦 Ice Cream Sandwich Cake: The Easiest Frozen Dessert Ever
Looking for a show-stopping summer treat that’s fun, easy, and no baking required? This Ice Cream Sandwich Cake is your go-to frozen dessert! Made by stacking ice cream sandwiches (or popsicles!) with layers of your favorite ice cream, whipped cream, and sweet toppings, this cake is cool, colorful, and totally customizable.
Perfect for birthday parties, summer barbecues, or a last-minute dessert idea, this ice cream treat will have everyone coming back for seconds.
🎂 How to Make a Stacked Ice Cream Sandwich Cake
🛒 Ingredients:
- Ice cream sandwiches (or popsicles, for a colorful twist)
- Ice cream (your favorite flavors—softened slightly for easy spreading)
- Whipped cream (or store-bought frosting)
- Toppings: chocolate sauce, caramel drizzle, fudge, sprinkles, crushed cookies, or candy
- Optional: fresh fruit (like strawberries, raspberries, or banana slices)
👩🍳 Step-by-Step Instructions:
1. Prepare the Base
Start by placing a layer of ice cream sandwiches (or popsicles) flat on a serving plate or cake stand. Arrange them side-by-side to form a rectangle or square base.
2. Add Ice Cream Layers
Spread a generous layer of softened ice cream over the base. Choose a fun flavor like cookies & cream, strawberry, or mint chocolate chip. Smooth it out with a spatula.
3. Repeat the Layers
Add another layer of ice cream sandwiches or popsicles, followed by more ice cream. Repeat as many times as you’d like, depending on how tall you want your cake.
4. Freeze to Set
Place the stacked cake in the freezer for at least 30 minutes (or up to an hour) to firm up before decorating.
5. Frost the Cake
Once the cake is firm, remove it from the freezer and frost the top and sides with whipped cream or frosting. This adds a smooth, fluffy finish and helps your toppings stick.
6. Decorate with Toppings
Now the fun part! Drizzle chocolate syrup, caramel sauce, or fudge over the top. Add sprinkles, crushed cookies, chopped candy bars, or anything you like. Finish with fresh fruit for a cool, colorful touch.
7. Serve and Enjoy!
Slice and serve immediately, or keep it chilled until party time. This ice cream sandwich cake is a guaranteed hit with kids and adults alike!
Advertisement – Continue Reading Below
Making a beautifully decorated birthday cake at home is easier than you might think! With a few basic tools, a dash of creativity, and some fun decorating ideas, you can create a cake that’s not only delicious but also worthy of the spotlight. Whether you’re brand new to baking or simply looking for fresh inspiration, these tips will help you whip up something truly special for any celebration.
🎉 Why the Birthday Cake Steals the Show
Let’s be real—when it comes to birthdays, the cake is the star of the show. It’s the centerpiece of the table, the moment everyone gathers around, cameras out, and the “happy birthday” song begins. But don’t worry if you’re not a professional baker. The secret isn’t perfection—it’s personality, creativity, and a whole lot of love.
🧁 Essential Tools for Decorating Cakes at Home
Before you start decorating, having the right tools on hand will make the process a whole lot smoother (and more fun!).
Here are a few essentials:
- Spatulas – for smooth, even frosting
- Piping bags and tips – for adding fun textures, borders, or rosettes
- Cake turntable – makes frosting and decorating so much easier
- Offset spatula – for clean edges and finishing touches
- Sprinkle set – because you can’t go wrong with sprinkles!
A small investment in basic decorating tools can instantly level up your homemade cakes.
🎨 Easy Cake Decorating Ideas Anyone Can Do
You don’t need expert skills to make a birthday cake that looks incredible. Here are some beginner-friendly ideas that create a big impact:
1. Sprinkle Magic
A layer of frosting and a generous handful of colorful sprinkles = instant party cake! You can even use shaped sprinkles to match the party theme.
2. Fresh Fruit & Flowers
Top your cake with sliced strawberries, blueberries, or edible flowers for a vibrant, natural look. It’s simple, elegant, and Instagram-worthy.
3. Theme It Up
Think about the birthday person’s favorite things—colors, animals, characters, hobbies. A little themed touch goes a long way. For example:
- Ocean lover? Try blue frosting and fondant seashells.
- Garden theme? Pipe buttercream flowers and leaves.
- Gamer? Add chocolate controllers or edible printed toppers.
4. Creative Cake Toppers
From DIY banners to figurines, cake toppers are a quick and easy way to tie your theme together without a ton of work.
🍰 Don’t Forget the Inside: Flavor Counts Too!
A stunning cake should taste just as amazing as it looks. Want to take it up a notch? Try these flavor ideas:
- Fruit jam layers – raspberry, lemon, or strawberry
- Chocolate ganache or Nutella filling
- Cream cheese or whipped frosting for a lighter texture
- Layer different cake flavors (vanilla + chocolate, anyone?)
Each slice becomes its own little surprise!
🥳 Make It Fun, Not Stressful
Remember, decorating a cake should be fun—not frustrating. Don’t stress about perfect lines or Pinterest-worthy photos. Your homemade cake will be loved because you made it. The joy is in the process, and with a little practice, you’ll get better each time.
💡 Final Tip: Practice Makes (Almost) Perfect
Like anything, cake decorating takes a little patience and a lot of play. Start simple and experiment as you go. With time, you’ll build confidence and might even start inventing your own signature designs.
So grab your apron, turn up your favorite playlist, and get ready to bake something beautiful. Because nothing says “I love you” quite like a birthday cake made from scratch—with extra sprinkles on top.